Thursday, August 27, 2009

Bathroom Wall


This is a room that I have put on the back burner for almost two years now. It's my basement bathroom. It goes unused for the most part but I finally decided to do a little something about it and here's what I came up with.
I basically just doodled on the back wall with a pencil and then painted over it with plain old craft paint. This project cost me ZERO dollars since I had left over paint from another project. I had already purchased these framed prints at a yard sale last year for $5.00. There are still some things I'd like to do here, but only when the cash allows me.
For now it makes me happy and is a nice change.

Sunday, August 23, 2009

Finish Chair Project (check)

I finally got my chair project done. It only took me two coats of paint and looks great (in my opinion). It kind of feels like an outdoor fabric to me. We'll see how she holds up.

Friday, August 21, 2009

A Great Weekend

I drove by a yard sale last Friday and look what I found. This rug was calling out to me from a distance saying "BUY ME, I'm only $2, it's ok, it's your birthday, do it. So I did what I was told to and brought her home. She looks so nice here in my kitchen.

Since last Friday was my birthday, one of my peeps came by and took me thrifting/antique shopping. We came to this quaint little place in Leota, IN. I'd never been there before, but the covered bridge is what really got my attention. This place is home to the Leota Country Frolic which is going on this weekend.

We went to several antique and junk dealers. I really enjoyed this store and I've added some pictures of the treasures I discovered at this place.


Glass door knobs

Barber shop chair, love that color.

Lots of old fireplace mantels.
This beautiful dresser.
For my fellow chair lovers

An entire building stacked full of old salvaged doors.

This old trunk that reminds me of my great Grandma
This chandy really got my attention. For all you milk glass lovers out there. Look at this beauty in waiting.

And look at those exposed beams and that tin ceiling up there. What a great day. I hope your weekend brings you this much pleasure.


Monday, August 17, 2009

Now That's Sharp

It's Make Your Monday at Twice Remembered and Knock Off Knock Out at It So Very Cheri so I've linked up this post. Check it out.
When we first started building our new home, there were certain things that I just knew that I wanted to have, even if it meant I had to sacrifice in other areas of my home. Take for example my kitchen. I knew I wanted to have custom cabinets made by Sharp Built Cabinet Co even if that meant I couldn't have granite countertops. I knew that the quality of these cabinets would be well worth the money spent. Steve from Sharp Built Cabinet Co is truely a master carpenter. I wanted a built in trash can and cutting board, but with Steve's years of expertise he put the cutting board directly above the trash can so that all scraps can be raked right into the trash can below. (Please ignore the trash)
And who doesn't want nicely, organized drawers?

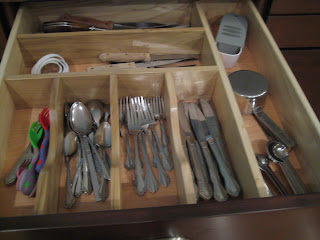
Since we were on a tight budget, I was only able to get one of these nicely organized drawers, but I do want to show you how I created more of these custom drawer organizers using only scraps. Here's what I did for the rest of my kitchen. Take any sheet of 1/4" plywood, or leftover paneling that you took down and was gonna throw it away, cuz it's just soooo ugly. Cut it to fit the bottom of your drawer.
Cut some boards or I used left over 1/2" MDF into 3" strips and then cut each piece to the desired length to fit whatever layout you want. Glue and screw these boards onto the plywood from the bottom side using wood screws.

Simply drop it into the drawer and there you have it. An organized drawer. You could paint or stain this as well.
If you are in the market for top-quality, custom cabinets, I would highly recommend using Sharp Built Cabinet Co. Check them out.

Painted Fabric Chair


So here's a sneak peek of the chair I've been working on. Here's the before.

This is after a coat of primer.So after much thought, I decided to attempt painting the fabric. The fabric was in such good condition that I hated to reupholster the whole thing. This is a picture after only one coat of paint. Kim said she did 4 coats, so I'm hoping that it won't take me that many. It actually looks better than I thought it would.

I hope to get it done this week and I will definitely post some pics.


Saturday, August 15, 2009

We Have A Winner!

Congratulations Amy from Designing A Life I Love. You are the winner of the Red House Happenings apron giveaway.

I have lots of projects going on this week, so stay tuned for some ideas that I know all you OCD, organizational type people will LOVE. And I hope to get the chair project finished as well. Thanks to all my followers and fellow bloggers for your participation in the apron giveaway. Have a Great Weekend!

Thursday, August 13, 2009

An Ugly Mess

Remember this ugly mess? NO, not all the junk in my garage, the chair. I posted about this chair that I found for only $7.00 at a yard sale. Well, I've been laboring over it this week. Stay tuned for the big reveal. Pictures should be up soon.

Tomorrow is the deadline to enter the apron contest. I will randomly pick one lucky person as the winner and make the announcement on Saturday.

Friday, August 7, 2009

Boutique


Here's another alternative for the skirt transformation that I posted before.
This is just a small sample piece that I will demonstrate. Sandwich a piece of printed fabric between two pieces of denim as shown.
Baste the edges together

Sew some random, curvy lines

Make a cut between the curved lines making sure you only cut the top layer of denim and then make several small cuts up to the seam line. (I hope that made sense)

Once this piece has been laundered a few times it will look like the picture below.

Sew this piece into your skirt as I described in my previous post.

Wednesday, August 5, 2009

Jeans To Skirt Tutorial

This is a demonstration of how you can transform your old jeans into a denim skirt. You will need one pair of jeans for the skirt and some fabric for the center panel. I like to use my husbands old worn out jeans for the panels.

First you will need to rip out the hems and the inside leg seams with a seam ripper being very careful not to rip the fabric. (do not cut it out)

Rip out inside leg seams

Once the inside leg seams are ripped, you will need to rip the curved seams up the front and back of the crotch just until the seam starts to go straight as shown:
It can be difficult to get all those little threads out of the seams that have been ripped so I just use masking tape. Press it firmly on the threads and then gently pull the tape off. It's like waxing your jeans.


Lay your jeans out flat on a table and pin into place:

Use your scrap pair of jeans or fabric of your choice to make the center panels for your skirt. I just cut a leg off and cut up the inside seam to get my panel.


Tuck your panel inside the skirt:


Pin the panel in place being sure to tuck under your seam allowances:


Turn your skirt inside out and trim away any bulk fabric:


Turn it right side out again and start sewing from the top and work your way to the bottom.


After you have everything sewn together you can turn it inside out again and trim away any excess fabric.


I repeat this process for the other side of the skirt. Once you have both front and back sides done you can hem it. Another alternative to this skirt is pictured below. On this skirt I did not turn under the seam allowances or the hem. I just left the edges raw and once it has been laundered a few times this is what it will look like.